Saturday, December 5, 2009

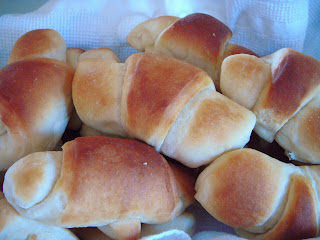
ROLL WITH IT ON YOUR ?TH B-DAY - MICHELLE!

I stole this recipe from Michelle 15 years ago, and have been enjoying the compliments I have been getting from it ever since! Thanks Michelle (again)! Actually I should be thanking her Mother, Roberta for giving birth to one of my dearest, funniest, and most youngest looking friends, ?? years ago TODAY! You heard it right people, it's the queen of cookin's Birthday today. No, not Paula Deen, I'm talking about Michelle, the cook that always has a perfect recipe idea to knock your socks off clear into the washer! She is always there for me in a recipe crunch, and I love her for it! I hope you have a wonderful Birthday Michelle! You deserve it! I am so blessed to call you friend -- speaking of calling, you better pick up the phone!


ROBERTA'S ROLLS

1/2 cup really warm water
1 Tb sugar
2 Tb active dry yeast

Mix this together in small bowl--set aside for at least 5 min. or until nice and foamy.

2 cups scalded milk
1 cube butter-cut into pieces
1/2 cup plus 2 Tb sugar
3 beaten eggs
2 tsp salt
7 1/4 cups flour (give or take)

In microwave scald milk for 3 to 5 min. Pour hot milk in your mixer attached with dough hook and add cut up butter. Allow butter to melt. Add sugar and beaten eggs and 2 cups flour, mix then add yeast mixture scraping the sides. Add 1 cup flour and salt mix, then gradually add additional flour. Total cups of flour about 7 1/2 cups. Beat until well incorporated. The dough will be pretty sticky. That's normal. If it looks a too soupy, sticky you can add no more than 1/2 cup to 1 cup more flour especially if you live in an area with high humidity.

Remove dough and place in a large well oiled bowl, cover and let rise 2 hours. If you have the time, you can add an extra hour.

Punch down dough and dump onto lightly floured counter. Prepare into desired roll shape. Lightly dust with flour when needed. Be careful not to add to much flour or your rolls won't turn out as light and fluffy as they should be.

Let rolls rise on pans until double in size. A good hour.

Bake at 420 degrees for 7-9 minutes. Or until they are nice and brown on top. The most important step is to brush each roll with melted butter after they are baked. Don't hold back!

*When I make cinnamon rolls I add about 1 1/2 more cups of flour until the dough is still sticky but the dough is starting to come off the sides of the mixing bowl. I'll post the cinnamon roll recipe later.


Wednesday, November 25, 2009

NOT YOUR TYPICAL GREEN BEAN CASSEROLE!

Zana called me this morning wanting this recipe. She will be in her lovely kitchen all day long, sweating over the stove, with flour and sugar flying through the air like pixie dust. Christmas music will be playing in the back ground, while her 4 girls will be decorating gingerbread houses and saying sweet nothings such as..."Mother, you are so bootiful with flour on your face!" Baby Thomas will be in his swing, perfectly content with a full belly of extra sweet milk (mom needs to find her energy somewhere)! And to top it off, the maid will be cleaning the kitchen during Zana's mid-day nap! We all know cooking and baking can really wipe you out!

That was my fun little day dream of Zana's life. You can call her if you want the REAL story! But I've gotta admit, it worked, I'm ready to get off my buns and get busy in the kitchen-Thanks Zana!

Favorite Holiday Green Bean Casserole

3/4 cup finely chopped onion
2 Tb butter
1 tsp salt
1/4 tsp pepper
1 tsp sugar
2 Tb flour
1 cup sour cream
4 cups french cut green beans-Canned or frozen
1/2 cup bread crumbs
2 Tb melted butter

Preheat oven to 350. In a skillet melt 2 Tb butter add onions and cook until onions are soft. Add flour (whisking) salt, sugar, and pepper. until combined. Stir in sour cream and green beans. Transfer to a baking dish. Mix crumbs and melted butter and evenly sprinkle over dish.

Bake for 25-30 minutes. Happy Thanksgiving!

Saturday, November 7, 2009

GRIN AND BEAR IT!


This was taken a few weeks after we moved here, and not much has changed in a year...the kids are still driving us and each other crazy! It was pointed out to us soon after Bryn was born that we had unintentionally made a statement in regards to our life and parenting...

Bryn and Garrett=Grin and Bear it!

This couldn't be more true, especially in the teenage years!! Don't get me wrong, they're still just as sweet and adorable as the day they were born, but that's only when they're asleep! No really, Garrett is still cracking us up, and Bryn thankfully is still a ray of sunshine around here, but she's only 11. I hope we have the same girl in 3 years! Who am I kidding, I have 4 sisters (although Zana has always been perfect)!

One of the many things I love about my kiddos is how they're always so grateful when I cook and bake. I love to make their favorite food and watch them turn to puddy in my hands!

They both share the same love for mashed potatoes, but I wouldn't make them as much because I don't really feel like gaining a pound after I have a bite or two. Thankfully I came across this recipe a few years ago and have been making it ever since. They never knew when I switched the recipe to the lower fat one, and they still comment that I make the best mashed potatoes! Let's get to smashing!


Low-fat Smashed Potatoes (As Zana's girls would say!)
Slightly tweaked from Cooks Illustrated

5 medium russet potatoes, washed,peeled, and cut into small pieces
3/4 cup milk--NOT nonfat!
2 Tb melted butter
1/4 cup low-fat sour cream
Ground pepper
Salt
Lawry's Garlic salt (optional)
Parsley flakes

In a large pot add potatoes and water to an inch above potatoes. Add 1 tsp salt and bring to a boil over high heat. Reduce to a simmer and cook for about 15 minutes or until tender and potato edges are soft and flaking off.

Drain and dump potatoes into your mixing bowl attached with a beater hook. Pulse a few times until they start to incorporate. Add milk, butter and pulse a more times until the lumps start to smooth out. Add sour cream and pulse to combine. Add salt and pepper to taste. I omit the salt if I use garlic salt and then sprinkle a little parsley. Be sure not to over mix or the potatoes will turn gummy.

Serve right away while it's hot to keep that perfect smooth texture!

Tuesday, November 3, 2009

I'm a Green Bean Eatin' Machine!

Michelle told me about this incredible recipe from Our Best Bites website. It sounded perfect for our Easter feast. I don't know why it's taken me so long to post this, but is a keeper! Never in my wildest food dreams would I think I'd crave green beans! It just goes to show you, life in the food blogging world just keeps getting better and better!

P.S. Those are caramelized red onions if your wondering...I know they look a little scary, but looks can be deceiving!

To Die for Green Beans!

1 1/8 pound green beans-washed, with ends snapped off and snapped in half.
1/2 pound bacon
1/2 red onion, sliced
4 garlic cloves, pressed
2 Tb soy sauce
2 Tb sugar
1/2 tsp kosher salt
freshly ground pepper
olive oil

In a small bowl combine soy sauce , sugar, salt. Set aside.

In a large pot bring water to a boil. Meanwhile, in a good sized frying pan cook the bacon. Remove from pan onto paper towels. Pour out bacon drippings from pan. When bacon is cooled, crumble into pieces.

When water is boiling, add green beans. Your just blanching them for a minute or two. Drain.

In the same pan you used for the bacon, add a little olive oil. When heated, add the sliced onions and pressed garlic. Saute for a minute-add the green beans, stir fry for a few minutes. Give the sauce a stir, then add to pan. Stir fry until the sauce starts to glaze and thicken. Add bacon and freshly ground pepper.

Wala! You just made yourself a killer side dish. Just remember to share!

Monday, October 19, 2009

Mmm... Berry Pie!


Here's another favorite Taste of Home recipe I've been making for what feels like 100 years! Dave would have me make this pie every week, but no, gotta keep 'em begging! The original name was Ozark Mountain Berry Pie-but we changed it to a more appropriate name and always sing our little song that goes with it.

Mmm Berry Pie Mmm Berry Pie, put it in the oven and it comes out hot! Can't get enough of that Mmm Berry pie... Thanks a lot!


Call me if you want to hear it in person!

Favorite Butter Pie Crust
Adapted from Martha Stewart

This pie crust can also be made using a food processor: Simply pulse in the butter for 8 to 10 seconds and add 1/4 to 1/2 cup ice water through the feed tube with the machine running.

Makes two 8- to 10-inch crusts
1 cup (about 2 sticks) cold butter
2 1/2 cups flour, plus more for rolling out dough
1 tsp salt
1 tsp sugar

Cut each stick of butter into eight pieces. Place the flour, salt, and sugar in a large mixing bowl, and mix to combine.
Add the chilled butter. Using a pastry blender, incorporate the butter into the flour mixture; the mixture should resemble coarse meal with small pieces of butter, the size of small peas, remaining visible.
Drizzle 2 tablespoons ice water over the flour-butter mixture, and blend. Repeat with an additional 2 tablespoons water. At this point, you may have to add more water: When a handful of dough squeezed together just holds its shape, you’ve added enough; if the dough crumbles, continue incorporating water, 1 tablespoon at a time, checking the consistency after each additional tablespoon.
Turn the dough out onto a clean work surface. Divide into two equal pieces, and place on two separate sheets of plastic wrap. Flatten, and form two disks. Wrap, and refrigerate at least 1 hour. I don't usually do this.

Berry Pie Filling:
1 1/4 cup sugar
1/4 cup plus 2 TB cornstarch
1/2 tsp cinnamon, optional
Dash salt
1/4 cup water
1 bag of frozen mixed berries
1 cup frozen blueberries
1 Tb fresh lemon juice
2 Tb butter

In a large saucepan, combine the sugar, cornstarch, cinnamon if desired, salt and water and lemon juice until smooth; add the fruit. Bring to a boil; cook (I mash up the strawberries a little) and stir for 2 minutes or until thickened. Set aside to cool slightly.

Line a 9-in. pie plate with bottom crust; trim pastry even with edge. Pour into pastry; dot with butter. Roll out remaining pastry. Trim, seal and flute edges. Pour 2 Tb 1 % or higher milk in bowl. With pastry brush, spread milk across crust. You just want the surface wet. Lightly sprinkle sugar over entire crust. Cut a few slits in the top crust and bake at 400° for 10 minutes. Reduce heat to 350°; bake for 45-50 minutes or until the crust is golden brown and filling is bubbly. Cool on a wire rack. Store in the refrigerator. Serve with vanilla bean ice cream. Mmmm Good!

Wednesday, October 7, 2009

GORGONZOLA PENNE with CHICKEN - Taste of Home Grand Prize Winner!

You can always trust a Grand Prize recipe from Taste of Home. We served this to guests and got rave reviews! It was easy and impressive-like a fancy Italian restaurant.
Bon Appetit!

Gorgonzola Penne with Chicken

Ingredients
1 package (16 ounces) penne pasta
1 pound boneless skinless chicken breasts, cut into 1/2-inch pieces
1 tablespoon olive oil
1 large garlic clove, minced
1/4 cup white wine
1 cup heavy whipping cream
1/4 cup chicken broth
2 cups (8 ounces) crumbled Gorgonzola cheese
6 to 8 fresh sage leaves, thinly sliced
Salt and pepper to taste
Grated Parmigiano-Reggiano cheese and minced fresh parsley

Directions:

Cook pasta according to package directions.

Meanwhile, in a large skillet over medium heat, brown chicken in oil on all sides. Add garlic; cook 1 minute longer. Add wine, stirring to loosen browned bits from pan.
Add cream and broth; cook until sauce is slightly thickened and chicken is no longer pink. Stir in the Gorgonzola cheese, sage, salt and pepper; cook just until cheese is melted.

Drain pasta; toss with sauce. Sprinkle with Parmigiano-Reggiano cheese and parsley.
Feeds about 8 happy guests.

Monday, September 28, 2009

Where have you been...Mexican Lasagna?!

I'M HOME! I still have more boxes to unpack and pictures looking for a place on the wall, but all I can say is I finally feel at home here in VA! We are still renting (which was not in the plans) and I'm surprised that I'm okay with it. All I know is this is the perfect house for our little family right now. The last home was quaint, but after the basement flooding numerous times, and the mold problem and the bugs and the...well you get the picture. Anyway, I'm back with a smaller kitchen, but a happier heart! I'm more determined than ever to get my recipes posted and soak up the beautiful life I've been blessed with here in Virginia!

Here's a favorite recipe I thought I lost in the move. It surfaced after I emptied a box from the garage! Do you see why I need to get my recipes organized!


MEXICAN LASAGNA


1 pound 85 % ground beef (I never use this, it still taste great without it).
1 onion-chopped
1 Tb veg. oil
2 Tb chili powder (I use 1 1/2)
1 tsp cumin
2 t sugar
1 tsp salt
1/2 c water
2 garlic cloves-minced
1 small can tomato sauce
1 can cream of chicken soup (Healthy Request)
1 cup light sour cream
1 can sweet corn-drained
1 can black beans-drained
1 can pinto beans-drained
1 package burrito size flour tortillas
4 cups shredded Colby- jack or Mexican cheese
1/2 cup chopped cilantro

In a skillet, saute onion in oil until tender-then add the rest of seasonings up to garlic-saute 30 seconds and add tomato sauce, cream of chicken, and water stir and cook until heated through. Set aside.

If using beef, cook in a separate skillet over med-high heat until no longer pink, about 5 min. Drain in colander, and transfer into a med. size bowl-
Add the corn and beans.

Assemble:

Lightly spray a 9x13 pan. Arrange about 2 tortillas in the bottom of pan. Evenly sprinkle with half of the bean mixture then pour about 1 1/4 cups sauce over beans and spread to evenly distribute. Sprinkle 1 1/4 cups of cheese over mixture. Layer 2 more tortillas then beans and 1 1/4 cups sauce and cheese, top with more tortillas and add the rest of sauce evenly over the top and sprinkle with cheese and cilantro. Bake at 350 degrees until cheese is melted and slightly browned, about 25 minutes.

Top with pico, or whatever floats your boat!